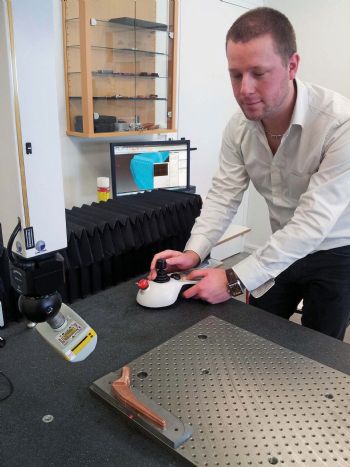
Laser scanning combined with touch probing on a co-ordinate measuring machine (CMM) fits perfectly with additive layer manufacturing practices at the French rapid-manufacturing service bureau Applications Additives Avancées (3A). Indeed, this metrology system is the key to reduced lead times and lower costs in the manufacture of medical, aerospace and other mechanical components.
Located in a high-technology industrial centre in Nogent, France, 3A was formed in January 2011 as a sub-contract manufacturer of titanium alloy and cobalt chrome parts using electron beam melting (EBM) technology. The firm mainly serves the medical sector, which presently accounts for 75% of its turnover, making standard and patient-specific implants and prostheses, as well as medical instruments. It also undertakes work for the aerospace and motor-sport sectors, as EBM is ideal for pro-ducing turbine blades, for example, plus single lightweight components that would previously have been multi-piece assemblies.
To provide quality assurance support for these activities (to ISO 13485 for medical devices), 3A bought a Nikon Metrology bridge-type CMM
(www.nikonmetrology.com) with an 800 x 700 x 600mm inspection volume. It was supplied with a Nikon Metrology LC15Dx laser scanning head capable of measuring regular and free-form 3-D shapes to an accuracy of less than 10µm — an order of magnitude less than the required accuracies of the parts being produced.
Pascale Marié, sales and marketing manager at 3A, says: “We are very happy with the scanner, which we believe is the most accurate on the market. It is the latest version from Nikon Metrology and the first to be installed in France. Before buying the equipment, we were aware that touch probing was unable to provide effective control of the highly complex geometries, such as lattice structures, that we build in our Arcam EBM system. That is why we chose the LC15Dx. However, for simpler 3-D ‘printed’ components, our engineers program the CMM to inspect the parts by touch probing, as it is faster and less costly in terms of operator time.”
Reduced forging costs
Ms Marié says that once the 3-D scanning head was operational, it attracted a lot of work that had not been envisaged at the outset. For example, one customer that manufactures medical implants needed all of its ‘legacy’ forging dies reverse-engineered to produce CAD files. Still in use today, the old die sets were originally either electro-eroded using copper electrodes or produced on a pantograph milling machine, so digital data did not exist.

Now, the customer sends 3A either the two halves of a forging die or the pair of electrodes that produced them. The data for reverse engineering is acquired on the Nikon Metrology CMM using its LC15Dx laser head and Focus Scan software. The turn-round time for the complete reverse-engineering process is just 2-3 days. Scanning a part takes from around 30min up to 2.5hr for a highly complex resin die, thanks to the speed of data acquisition with laser scanning, which measures 70,000 points per sec at intervals of 22µm.
The digital CAD models allow the customer to prepare metal-cutting cycles so that the forging dies can be machined on modern high-speed cutting equipment in a process route that costs 35% less and is considerably faster than when dies were spark-eroded. The resulting financial advantage is significant. A second scanning application is the repair of existing tools.
Once CAD models are available for a die set, it is possible to scan a used forging tool in order to accurately rebuild the two halves by ‘repairing’ the metal in the places where they are worn. Those areas are machined and polished, after which further laser scanning allows the new profile to be referenced against the digital model. Any areas of concern can be highlighted using interactive or automatic deviation analysis, with colour mapping and reporting within the Nikon Metrology Focus Inspection software package.
High-quality surfaces
Irrespective of whether the scanner is used for reverse engineering, or for inspecting parts against CAD models to control the dimensional conformity of EBM-manufactured components or to help optimise die refurbishment, the capture of accurate point cloud data is essential. This is where the LC15Dx scores, as the accuracy of the measured results is comparable with those of tactile inspection.

Ms Marié says: “The point clouds resulting from scanning the free-form profile of a component are filtered and meshed into NURBS (non-uniform rational B-splines) surfaces that are grouped to create the CAD model. The smoothness and accuracy of the surfaces generated by the Nikon Metrology CMM, scanner and software are so good that the 0.1mm tolerance required for subsequent forging-die manufacture is easily maintained by our customer. Quality control over our own 3-D additive-manufactured components is similarly reliable.”
Reflective surfaces are prevalent throughout 3A’s operations, as forging dies are hand-polished to achieve high accuracy, while some implant surfaces — notably those for knees and hips — are honed (mainly to optimise the friction coefficient). Laser scanning is usually susceptible to errors when inspecting such reflective surfaces, but the LC15Dx with its high-quality Nikon lens handles the conditions well. Unwanted reflections are neutralised by an advanced software filter, while changes in ambient light are absorbed by an optical daylight filter. Only when it comes to parts with a mirror finish is manual intervention necessary (for spraying the part with a matt coating prior to scanning).
The relationship between Nikon Metrology and 3A has progressed to such an extent that the additive manufacturing service bureau has agreed to act as a showroom and demonstration centre in Eastern France for the supplier’s inspection solutions.