Buckinghamshire-based
Gibbs Gears produces high-precision gears, shafts, and machined components for the UK, and increasingly, for worldwide markets. A family-owned business for over 60 years, the company’s in-house expertise and extensive plant list allows it to serve customers involved in some of the world’s most demanding sectors, including aerospace, motor sport, medical, marine, and ever-increasingly, electric vehicles.
Having established an excellent reputation for the quality of its output, Gibbs Gears continues to apply the most rigorous quality control procedures and is approved to AS9100 Rev C, BS EN ISO 9001:2008 and AS 9100D | ISO 9001:2015.
In keeping with its enduring quality philosophy, the business operates a variety of hi-tech quality control devices at its facility in Stoke Mandeville. To ensure that it remains at the cutting edge of inspection technology, the company regularly updates its equipment in this critical area.
The latest additions to Gibbs Gears’ advanced quality control aids are two newly installed Zeiss CNC Coordinate Measuring Machines (CMMs) supplied by Cambridge-based
Carl Zeiss Ltd.
Due to factors such as the company’s extremely demanding precision standards and the need for inspection routines to keep pace with growing production volumes, before searching for the new CMMs an exacting specification ‘wish-list’ was compiled.
Gibbs Gears has been an enthusiastic user of a Zeiss DuraMax CMM for many years, although, given the costs involved and the potential technical gains that could have been made with other metrology manufacturers, in addition to considering the offerings from Zeiss, CMMs from alternative suppliers were also considered.
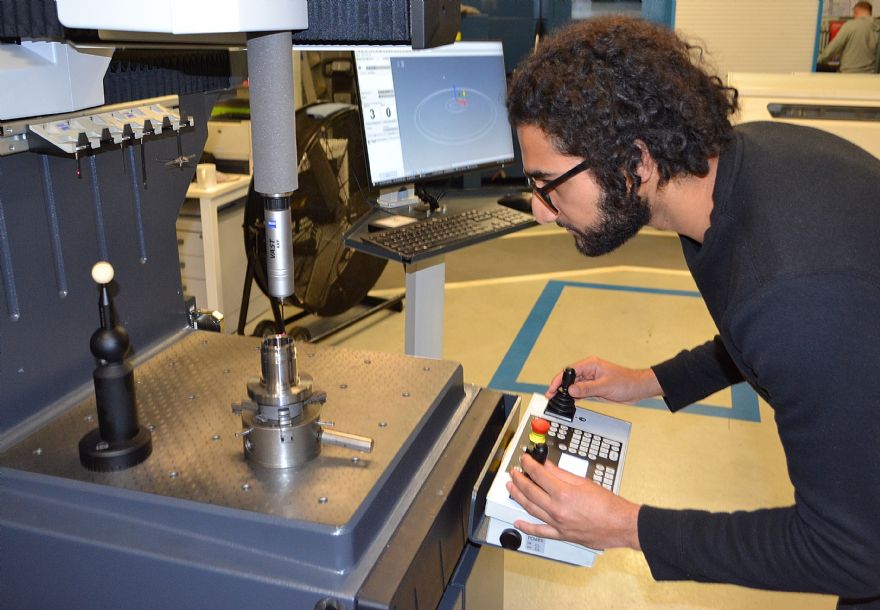
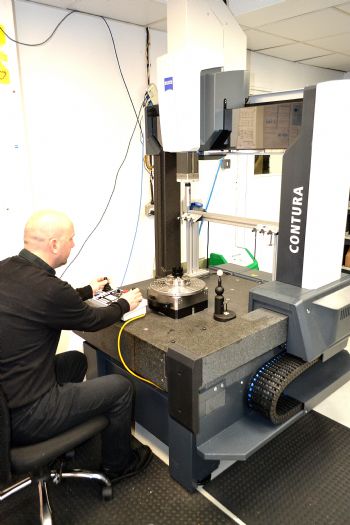
Challenging requirementsHaving explored the available options, it was decided that two Zeiss CNC CMMs best matched the company’s challenging requirements. Consequently, Gibbs Gears placed an order for a high-precision Zeiss Contura CNC CMM for use within its temperature-controlled quality department, and a latest generation Zeiss DuraMax CNC CMM was acquired for use on the company’s shopfloor.
Each of the Zeiss CNC CMMs were specified with the addition of high-accuracy rotary tables to provide 4th-axis capabilities and the ability to undertake complex, high-precision gear inspection routines.
Rob Jackson, Gibbs Gears’ chief inspector, said: “Having enjoyed trouble-free operation from a DuraMax CMM and excellent service from Zeiss for the past eight years we have a natural bias towards the brand. However, given the potential major outlay and the importance of accurate CMM inspection to our quality function — as we do when contemplating all capital expenditure — we still looked at alternative options.
Following our research, it became obvious that an advanced ZEISS Contura CMM and the latest DuraMax CMM, matched, and in some areas exceeded our demanding CMM specification requirements, and were the best CMM options for us.”

The Zeiss Contura CNC CMM is now helping to ensure the rapid completion of high-precision, complex inspection routines in Gibbs Gears’ busy inspection department. In addition to being an ideal, precise CMM for today’s demanding inspection requirements, it is also Industry 4.0 ready.
Thanks to the use of a common interface, Gibbs Gears’ inspectors are able to switch between different sensor technologies, such as optical or tactile probes, in just a few simple steps. While the Contura’s rotary table enables challenging four-axis gear measuring routines to be performed.
Reflecting Gibbs Gears’ all-embracing approach to quality, in addition supplying its quality department with the best possible inspection technology, the company also provides its skilled production staff with high-precision inspection aids such as the recently installed Zeiss DuraMax CNC CMM.
The DuraMax is equipped with the Vast XXT scanning sensor, therefore, in addition to undertaking all customary inspection routines, the adaptable CMM can also be used to capture contours and freeform surfaces.
The cost-effective CMM is able to replace a wide range of commonly used gauges and to eliminate the costs associated with the up-keep and regular calibration of measuring equipment. The DuraMax also reduces time lost in finding gauges that can be located throughout the shopfloor.
Occupying a minimum amount of valuable shopfloor space and offering convenient four-sided component loading, the DuraMax is considered ideal for delivering precision measurements in less than ideal environments.
Impressive accuracyThe robust CMM employs passive vibration damping and is able to maintain its impressive accuracy specification in temperatures up to 30degC. The ‘plug and play’ DuraMax does not require the provision of compressed air, while its shopfloor-proof attributes are further enhanced by its guideways being completely covered.
Mr Jackson added: “As well as delivering outstanding levels of precision, due to our new Zeiss Contura’s ability to perform rapid, automated CNC measuring routines, the advanced Zeiss CMM has significantly reduced our inspection times.
“In addition to the advantages gained in our inspection department, our new Zeiss DuraMax CMM is now fully integrated into our production schedules and allows high-precision, in-process measuring routines to be performed.
“Our quality experts write all of the required inspection programs off-line and load them onto the DuraMax, and when required, our production staff simply recall the relevant program and perform fully automated CNC measuring procedures on their components.
“Although we have purchased specialised Zeiss CAD and gear related software with our new CMMs, it is a major advantage that both machines use Zeiss Calypso software. Our staff find Calypso very easy to use as it is based on visual metrology and doesn’t need in-depth programming or complicated code input. As part features from drawings or CAD models are stored as icons, we are able to simply select the relevant icon and a measurement plan is completed.
He concluded: “The nature of the customers we supply, such as the electric vehicle industry, means that in addition to manufacturing and inspecting to ever-increasing precision standards, we are frequently faced with extremely short lead times. The impressive speed and accuracy of our new Zeiss CMMs has enabled us to meet the challenges of increased precision and to significantly reduce our inspection times.”