Every gram counts when designing and building lighter more-fuel-efficient aircraft, therefore the ability to economically mass-produce lightweight, yet strong high-precision composite components represents a major aim of the global aerospace industry.
When staff of
Surface Generation Ltd used the company’s proprietary ‘Production to Functional Specification’ (PtFS) systems to develop a highly-efficient and cost-effective method of producing aero engine structural guide vanes made from carbon fibre reinforced plastic, the worked closely with the Measurement Services Department of Andover-based
Mitutoyo (UK) Ltd to ensure the regular supply of high-precision inspection data.
Surface Generation was established in 2002 to develop and commercialise its ‘unique PtFS process’; and following two decades of ‘technical advancements and impressive levels of growth’, the company now has a large international customer base.
The company’s clients use PtFS to optimise their use of advanced composite materials and to enable ‘highly controlled and efficient manufacturing’ to take place. The use of PtFS is not limited to fibre reinforced composites and may be successfully used to process unfilled thermoplastics, advanced metals and glass.
Surface Generation’s PtFS technology integrates heating, cooling, and process control systems to enable the delivery of maximum performance in both turnkey and retrofitted applications. The company’s systems, combined with custom software, provide the first ‘digital moulding environment’ where ‘active thermal management’ delivers massive savings in both cycle times and energy consumption.
In addition, the use of PtFS leads to significant reductions in the pressures needed to process challenging materials and parts with complex forms. Explaining the successful development of the aero engine structural guide vanes production methods and the assistance provided by Mitutoyo’s Measurement Services Department, Surface Generation’s Alasdair Ryder said: “By precisely controlling temperature, displacement and force application during manufacture, PtFS provides improvements in accuracy, speed, manufacturing economies and part performance, even when using the most challenging of materials.
“In addition to much faster delivery times and cost reductions, PtFS allows our users to gain significant improvements in product quality. Indeed, it is now used throughout the world by a range of sectors, including the automotive, consumer electronics, medical, oil and gas, and the aerospace industry.”
High precisionHe continued. “Traditionally made from metal, aero engine structural guide vanes are high-precision fixed elements with critical form, finish and structural requirements. When tasked with using PtFS to deliver enhanced process yield and a reduced cycle time, we had to demonstrate that parts met the necessary geometrical tolerances.”
“Although we have a fully equipped inspection department at our Rutland facility, including a Mitutoyo CMM with tactile probing, the levels of manufacturing precision were such that we needed to find an expert inspection sub-contractor that had access to high-precision CMMs with advanced scanning capabilities. We found the ideal partner in Mitutoyo’s Measurement Services Department.
“Multiple material and production variables were involved in each stage of developing the structural guide vanes’ manufacturing methods, and each had the potential to impact upon the components’ accuracy. Therefore, following the production run of each new iteration of the components, we supplied a sample batch to Mitutoyo’s Measurement Services Department. After undergoing high-precision scanning routines each part was quickly returned to us with an in-depth inspection report.
“Our use of PtFS and the detailed inspection data supplied by Mitutoyo has now resulted in the development of an optimal, production process that guarantees the extremely efficient manufacture of lightweight, strong and highly precise structural guide vanes with extremely accurate aerofoil geometries”
Andrew Fifield, Mitutoyo Measurement Services’ manager, added: “Mitutoyo’s Measurement Services Department supports a multitude of UK companies across a wide range of industrial sectors. Our customers use our services when their QA inspection demands exceeds in-house capacities or when greater capability and outside help is the most timely and effective way of meeting measurement challenges. In addition to many other metrology services, our Coventry- and Halifax-based measurement centres offer a full range of third-party measurement, reporting and CMM programming services.
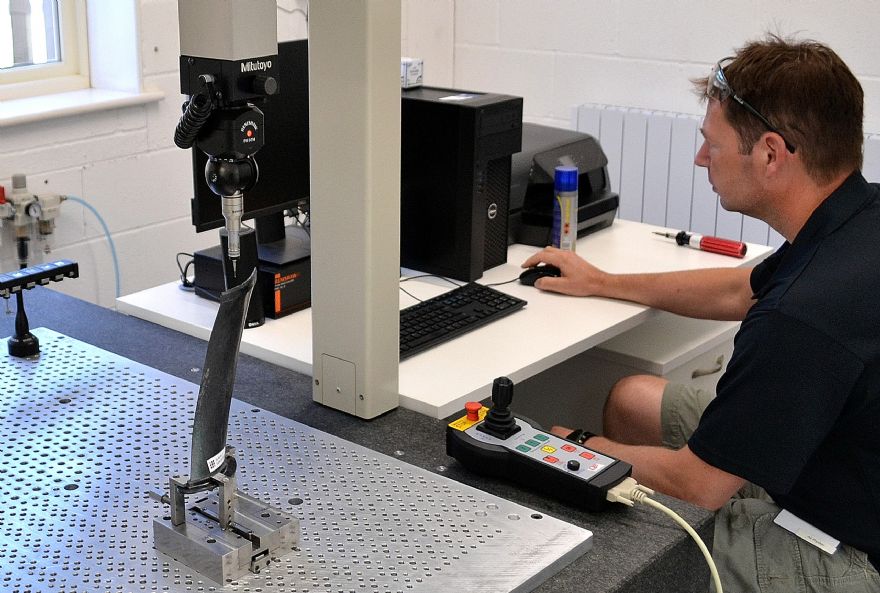
“The detailed inspection routines carried-out on Surface Generation’s structural guide vanes were made with the use of a high-accuracy Mitutoyo Crysta-Apex S CNC CMM, that guarantees a maximum permissible length measurement error of ‘E0,MPE=(1.7+3L/1000)μm’.
“To further ensure maximum scanning precision the CMM was fitted with a Renishaw SP25M scanning probe. As the components featured highly accurate aerofoil profiles it helped that we specialise in the measurement and programming of aerofoil components such as turbine blades, compressor blades, nozzle guide vanes and parts with similar precision profiles to that of the structural guide vanes.”